Writing a check might seem a little tricky, especially if it’s your first time, but in reality, it’s relatively straightforward.
Since most checking accounts come with a checkbook, understanding how to fill in a check is important.
In this article, we offer a step-by-step guide to filling out a check and what to look out for to keep your financial information safe.
What Information is on a Personal Check?
Before we get started, it’s worth taking some time to familiarize ourselves with a paper check layout. Most personal checks follow the same structure, regardless of the financial institution that issued them, making it easy to understand all checks.
Checks come with three different numbers. You’ll find these numbers towards the edge of the check.
- The first number you’ll find is the check number, typically located at the top right corner of the check. This number represents the check that you are writing, making it easier to refer back to it.
- At the bottom of the check (left-hand corner), you’ll see the routing number of your bank account. The bank uses this number to help locate your account.
- Finally, you’ll find your account number at the bottom right corner of the check. This number is for the account from which money will be coming out when someone cashes the check.
If you’re not sure whether you have enough money in your account, you can use this number to identify the account in your mobile banking app or the bank’s website.
In the middle part of the check, you’ll find several different lines and boxes. That’s where you will be filling in your information.
How To Fill Out a Check
Filling in a check is easy and can be completed in minutes. It is not necessarily essential to follow these 7 steps in order, as long as you complete all steps.
- Enter the Date
- Enter Payee Information
- Write the Check Amount in Words
- Enter the Check Amount
- Fill in the Memo
- Sign the Check
- Fill in Your Check Register
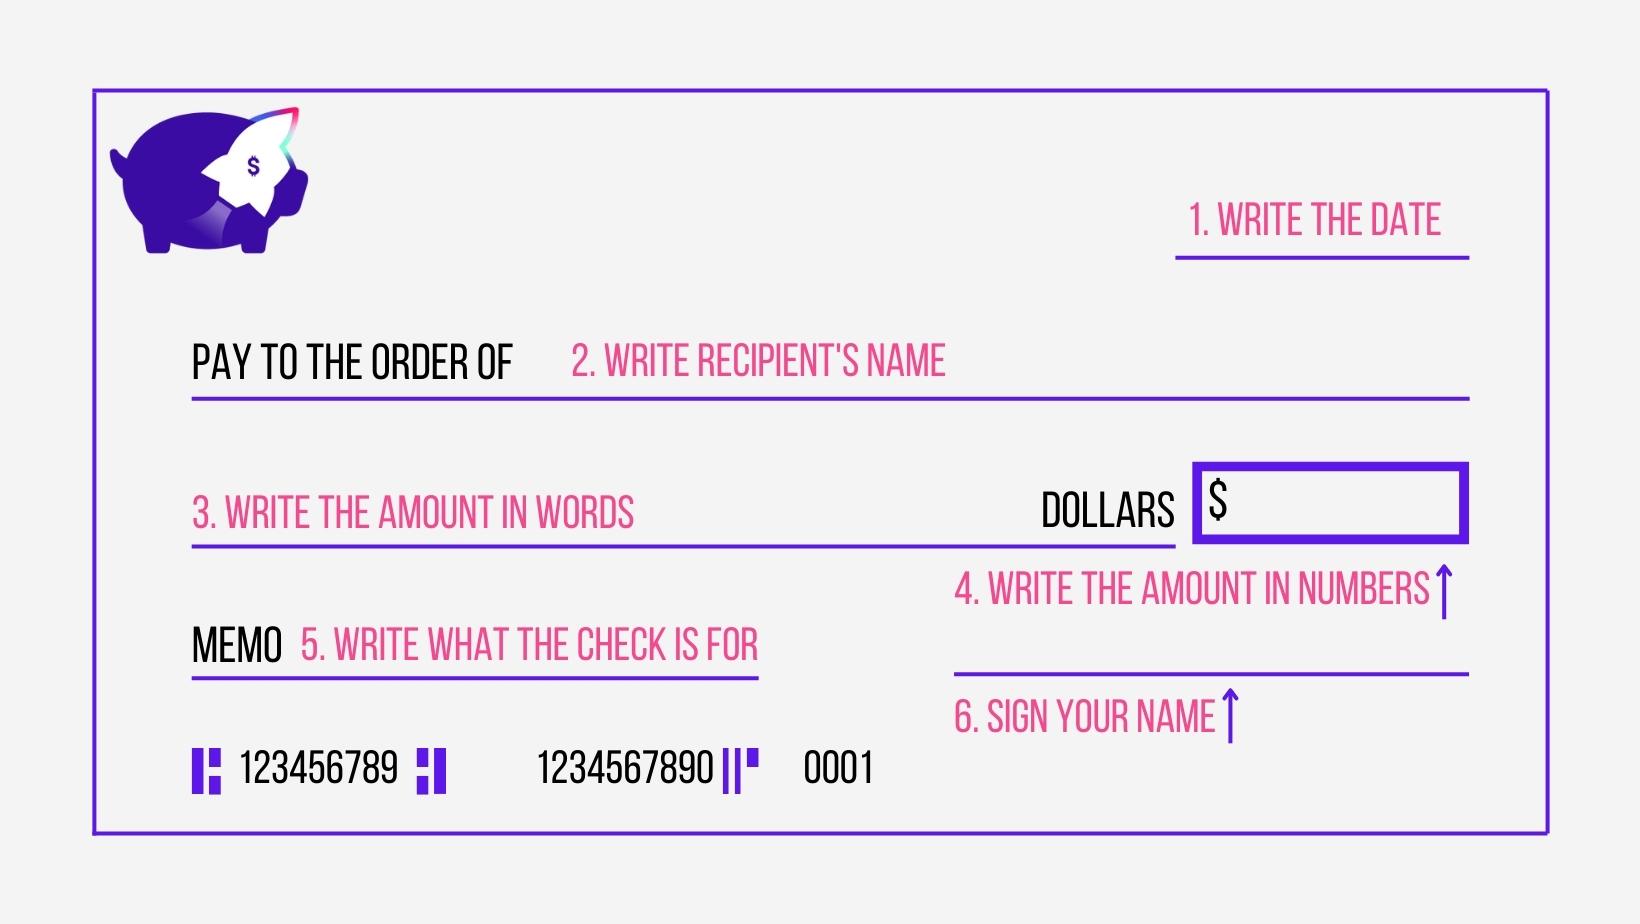
Step 1: Enter the Date
The first step to writing out a check is to fill in the current date. Write it in the space next to the date, usually located in the top-right corner of the check. Here, you should always write today’s date. That will make it easier to track what money is going out and when.
You can use any date format you want but make sure it is clear and easily understood. Make sure that you include the day, the month, as well as the year.
While postdating checks is a legal practice, writing checks when you don’t have the funds to cover them in your account is illegal. You might also incur an overdraft fee or NSF fee charge.
It’s worth knowing that you can still cash checks before the date on the check unless you have a prior agreement with the bank. Though you might have to pay a fee, so be sure to check with your bank first.
Step 2: Enter Payee Information
Once you have filled in the date, it is time to enter the payee information, the name of the person, or the company to whom you’re writing the check. Often this is also referred to as the recipient’s name. You’ll need to write this on the line that starts with “Pay to the order of.”
To help you avoid fraud, try to write the full name of the person or company you are writing the check to, but this is not a requirement since some abbreviations are allowed.
Step 3: Write the Check Amount in Words
Once you have entered the check amount, you can write down the amount of the check, but in words, e.g., ONE HUNDRED AND THIRTY.
Doing this is important as it provides a double-checking mechanism for the bank to verify the amount. You can quickly identify this space as it is a line with the word DOLLARS at the very end of it. It also prevents the numbers written down from being altered as it is far more difficult to turn the word zero to nine than it is to turn 0 to 9.
Avoid making spelling mistakes and try to write in block letters since this tends to be more legible. If there is any space left after you wrote down the amount, make sure to cross it out by drawing a line until there is no space left to write down anything else on that line.
Step 4: Write the Check Amount in Numbers
Once you’ve entered the date and the payee information, enter the check dollar amount (in numerals). You’ll need to do this in the small box preceded by a dollar sign ($), right next to the line where you have entered the payee name.
There is no need to write down the dollar sign since that’s already on the check. Here, you should only use numbers and make sure each numeric is clear and legible.
You can include cents by putting in a decimal point before entering the cents amount.
Step 5: Fill in the Memo
While this step is optional, it’s best not to skip it. The memo section is in the bottom-left corner of the check and allows you to write a brief description of the check payment.
Filling this in can help you and the recipient of the check stay organized – and make sure the payment gets to the right account.
Step 6: Sign the Check
Next, you need to sign the check on the signature line. You’ll find it at the bottom-right corner of the check.
Make sure you use your usual signature and avoid using any variations. Doing this will help you from having the check flagged as fraud.
Remember that a check without a signature can’t be cashed and may be subject to fees (including returned check fees and late fees if the payment doesn’t reach its intended account on time).
Step 7: Fill in Your Check Register
A check register is a list of transactions that have either made it in or out of your account. Filling in your check register after you write a check helps you maintain an accurate record of your account balance so that you’re fully aware of how much money you have in your account at any given time.
Check registers come in all shapes and sizes – from paper form to electronic spreadsheets or even mobile apps.
Congratulations – you’ve now filled in the check and can give it to the recipient. Once you do that, make sure that you record it in the check register. Doing this can help you make sure that you note the payment that has just gone out and update your records to reflect your account’s balance. We will be covering this in more detail next.
How to stay safe when using checks
While checks are generally very safe, they do not provide any warranty against fraud or misuse. Take the below tips into consideration to make sure you stay safe.
Use permanent ink
Using permanent ink can help you make sure that the check is not blanked out and re-written for a higher amount. Avoid using pencils at all costs since this is very easy to erase.
Do not issue blank checks
Blank checks allow the person you’re giving the check to write any amount they want. While you might trust the person you are giving the check to, you could be footing a costly transaction if that check gets lost or stolen.
Don’t leave empty spaces
Make sure you use all of the spaces designated for writing fully. Doing this can help you avoid having any numbers added to the amount you wrote. If there are any spaces left, make sure you cross them out with one continuous line.
Always use the same signature
Ensuring that you always use the same signature makes it easy for the bank to identify fraudulent checks written out from your account.
Don’t write a check to cash
Instead of writing the payee’s name, you can write ‘Pay to cash,’ which means that anyone can cash that check. However, doing this isn’t a good idea as the check can get lost or stolen, and anyone will be able to cash that amount.
Limit check use
While checks are relatively safe, they are not the safest way to transfer money. ACH transfers, Bill Pay, and payment platforms such as Zelle reduce the number of steps you need to take to transfer money with zero travel since there is no physical paper involved.
Frequently Asked Questions
Can I write a check for a future date?
While it is legal to write a check for a future date, you must make sure there are funds available in the account on the day you write the check. Remember that you can cash postdated checks at any point once it has left your hands, and you may incur fees if there isn’t enough money to cover the full amount of the check.
How do I order checks?
If you run out of checks, you will need to contact your bank to issue you with a new checkbook. Most banks allow you to order new checks through their online banking or mobile banking app, so you might want to check there first before calling or emailing your bank.
How do I cash a check?
Cashing a check is easy, and typically you will have several options available at banks or credit unions. Many of the best banking apps offer mobile check deposits, which allow you to deposit the check through your phone.
Your best bet is to use your own financial institution because it’s free and convenient. If you don’t have a bank account, then cashing a check at the bank listed on the check might be a good idea.
Alternatively, you can also visit your branch or the issuing branch or a cash-checking store such a payday lender stores and participating grocery stores. Most major retailers, like Walmart, will have a check-cashing service available, but you might need to pay a small fee.
Can I get a checkbook if I have a low credit score?
Checkbooks are typically issued with checking accounts, so if you can get a bank account, you’re likely to qualify for a checkbook.
Some checking accounts, such as second chance checking accounts, don’t come with a checkbook. If you’re unsure what type of account you have or if you qualify, it’s best to speak to your bank to confirm and see what options are available to you.
Learn More:

Read 1 comment
Read Comments